Monday, November 27, 2006

Time to do something Unique with this bike.


I decided that since I had to rebuild this whole bike I should make the bike different from every other Vstrom out on the market. The easiest way to do this and make it stand out is to have it repainted. Since I had all new plastic of multiple colors, and had to remove and repair the frame I felt that I should take advantage of the situation rather than sit and cry about it (hey, make lemonaid when given lemons). It took me a while to decide what the color scheme would be but I wanted the bike to be different, a bit sinister, but still somewhat businesslike. I decided that a red and black bike would look very different and since the cowling was already black (on all Vstroms) that would be a natural. Since all Vstroms have either a silver or black frame I decided that the frame would get a fresh bright red powdercoat. Pretty nice before and after picture here.

It started with the procurement of a red gas tank. My yellow one was pretty well dented and I found a great one with a very small dent directly underneath where a tank bra would be (I planned on putting one on anyways) and got it for soemthing like $50 off ebay. This pictue shows the assembly as it ws progressing but it shows the match (or mismatch) between the gas tank and the frame. If you look real close down in the rear corner of the gas tank you might be able to see the very small dent which saved me about $375 on the price of a brand new tank. This was also off a DL650 andfit without any problem.

Then the frame was repaired. Remember it had broken the tang off that holds the left side of the crossmember which attaches to the rear of the gas tank. I found a great aluminum welder and it was easily repaired after being removed from the bike. Notice the weld at the bottom of the tang in the picture. See the weld to the left of it on the main frame...that is a factory weld and you cannot tell the difference. After seeing this I was sure it would be strong enough to hold the top post of the rear subframe and the gas tank crossmember. Beautiful work!

Then it was off to the powdercoater. It was somewhat costly because the color I wanted required several treatments to get the smooth "satin" finish that I wanted. I decided if I was going to do this it might as well bedone right (Knowing full well this is just money pissed away). I was not sure if I would use the rear peg and muffler holders but I had them powdercoated as well. That turned out to be a good decision as they add stability to the exhaust system that I still desire. I have to say, in my defense of recklessly spending money that this turned out to be just trick as hell!

Having a chain hoist (Chainfall) sure makes assembly of items like this easy as I can lower it right into place before putting in the locating bolts. I will also say that about $200 in special tools to remove and replace the special bolts holding the frame to the engine and the swingarm to the main frame was not a happy purchase - but it had to be done to get the job accomplished. You can see here the mating of the frame to the engine which is on a stand that I made to haul the bike around the shop while it was in it's various stages of rebuild.

After getting the frame back it was time to get the plastic painted. I had yellow, blue, silver and black pieces. I wet sanded all of the non black items and then repaired any cuts or blemishes with fiberglass repair kit and bondo filler. I took it all to a local painter of classic cars and he was happy to shoot it all a nice gloss black. While I have seen better jobs it was good enough for the punishment this bike will take and it looked great with the red.

Finally the bike is coming together - red tank, red frame (hey not a perfect match but the bra really separates them enough that it is not noticed at all. Sort of like picking a tie that is not the exact same color as your pants - as it is absolutely impossible to get a perfect match.

Friday, November 17, 2006

Electrical Can get Complicated on these bikes!!!

With that in mind, and now that I have outfitted four bikes for rallying, I have some experience in doing these setups and have some basic conventions that I carry through from one bike to the next. Then I have improvements that keep getting made. Since I had wired this exact bike once before I knew all the places whereI wanted improvement.

My prior setup really consisted of a single auxilliary power block underneath the seat. This power block is actuated with a 30 amp auto (rat shack) relay. That relay was designed with 6 circuits:
  1. Always on Instruments (GPS/V1/Salamander SAE Plug)
  2. Switched Instruments (Power Port/Voltmeter/Littlight/Heated Grips
  3. Hawke Oiler (Not used on the reconfigured bike)
  4. Phillips HIDS
  5. Widder Control
  6. Tiny HIDS (Not used on the reconfigured bike)
This is the old schematic I did for the Vstrom the first time around. Of course this stuff (nice pictures) is not my profession so this is the best I could do. As you can see it does get somewhat complicated. One of my goals was to simplify this in the rebuild.

I accomplished this by removeing two of the circuits (Hawke Oiler and Tiny HID's). I also ran the new HID lights in the stock reflectors off the stock headlight wiring (as described in the prior posts).

I also had a problem with the original set-up that was getting magnified on this bike. The subpanel would not be easily accessible (I would have to remove several bolts and take off the aux fuel with platform) to get to it underneath the seat. In the case of a blown fuse that might be a problem as it would take time to simply remove and replace. I've found that I have very little problem with this as long as I use good looming and secure my wiring (most fuses get blown from a short). The addition of soldering critical joints would also assist in alleviating wiring and blown fuse problems.

Still - all my bikes have a problem. When it rians I usually remove my V1 and sometimes the GPS if it is a real frog choker (do I really have to worry about the V1 signalw when I'm going 30 mph in a driving rain?). Since these wires are always hot the ends are then exposed to rain. A single drop can cross the pos and neg on the Garmin connector and especially can short out the R45 telephone connector used for the V1. It is not uncommon to wash the bike and find out I have blown that little 5 amp fuse because of water exposure or even dew overnight can short out the circuit. This means a simple rain storm could cause me to have to get the seat off to replace that fuse (which is on a separate line away from the power block wired directly to the battery. Of course I do this because I like to have my GPS and V1 running all the time even when the bike is not running.

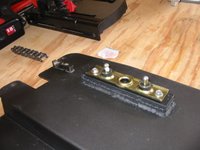
What I did to aleviate this problem was to put a waterproof switch in line with the hot wire on the right cowling panel of the Vstrom. That way I could power down that circuit anytime I desired (like when I left the bike outside for the night or I could power it down during and short storm to avoid making a complete stop). The glossy line near the base of the switch is some RTV sealant I used as the hole I cut was not as exact (that will teach me to do "on bike" mods!) as I would like it.


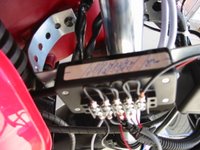
The next change I made was to run one large feed from the aux panel up to a separate power stripl in the front of the bike. This could be accessed by removing the large right side side panel and makes additions/changes and on the road diagnostics much easier. To accomplish this I put a Positive power strip inside of a little plastic "job box". This was attached to the right side rail I had put underneath the fairing to mount the HID hardware on (see prior post on lights). I also drilled a through hole so I could bring power out of the front of the box to the switch for the GPS and V1. This ways I could run the wires for the front forward from the auxilliary panel together, and then through the front panel. All the positive feeds come out of the bottom of the little plastic box (protecting all the circuits from the elements). Finally I used trim tape to mount another power strip to the outside of the job box for negative leads. This simplified the wiring on the aux panel to four simple circuits:
  1. PHID's
  2. Fwd Power strip
  3. Widder Power Plugs
  4. Rear mounted SAE Plug (Salamander) used to power primarily the Star Trax but can be used for anything - like a tire pump!
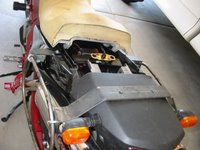
I have been very pleased with the results and really feel it will eliminate any problems. The two primary panels are seen in the pictures below. The rellay to the left of the aux panel is the main power relay. It is activated by power to the tailights and in that manner turns the power to the panel off and on with the key. The relay on the right of the panel is for the PHID's which have much of their wiring in the tail of the bike along with the ballasts that you can see in the second to last picture below.

Note: The third pictue below shows a wide view of the complete auxilliary panel. The red wire behind the battery is the circuit for the "always on" power for the GPS/V1. The fuse for this circuit is directly underneath the rubber battery retainer.


Wednesday, November 15, 2006

The rear end of the Vstrom is one of the butt ugliest known to man - so lets fix it!

You can see the stock rear mud flap hangs down covering about 1/2 of the rear tire. Very functional but this is one time where aestetics trumps function on my bike. I just could not live with this abomination. I wanted to move the plate between the mufflers but had a couple of items to overcome. First, it would cover the key access for removing the seat (or in my case the latch for the aux fuel platform). Second, it would wipe out the license plate light feature which is required and can be something you can be stopped for and ticketed (now there is a waste of time!).

I decided that if I cut off the fender just below the license plate light and if I removed the light I could use the two holes through the plastic apron for mounting whatever I came up with. This would effectively move the license plate up about 6 inches and put it just below the tail light.

I knew that I could use a spring loaded cupboard latch with two flat mounting plates to make the license fold down and then spring back into place, but was not sure how secure the mounting would be. I fashioned two plates from 1/8 aluminum sheet. One was the size of the license plate and the second was the size of the mounting plate for the hinge with two holes drilled in it to attach to the Plastic fender apron.

I carefully fashioned the smaller plate and drilled the two holes to attach to the bike. Then I drilled the thwo holes to match the mounting plate for the hinge. I then make a plate approximately the size of the license plate and drilled a pattern in it to match the license plate and, down in the bottom, a three hole pattern to match the other attach plate of the hinge. the Idea was to attach the two plates together with the hinge at the bottom so they would fold down (apart). Attach the whole assembly to the bike with the small plate and attach the license to the larger Plate. All was fine until I tried to assemble and found that the bolts and plates had a build up and would not let the two plates get close enough together to seat the hinge in the folded position.

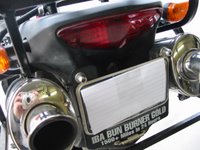
It was also heavy and I was afraid it would fold down on it's own when hitting a sharp bump. So I cut out the large plate into a "U" shape removing the center of the plate. Then I ground the smaller plate into the shape of a clover leaf to allow for clearance of the three attach bolts holding the large plate to the hinge when folded. You can see the result in the picture above.

Next was the issue of the license plate lights. I decided to get a pair of illuminated bolts and use them to attach the top of the license plate. I attached those to the existing light pigtail and then duct taped it to the rear of the plate to keep it in place so it would not rub a short into the line. It is carefuly routed so that when the assembly folds the wire sits in the clover shaped hole in the rear (small) plate. This works great but I will admit these lights illuminate almost NOTHING - but I believe it does satisfy the legal requirement.

Finally as a precaution to the assembly still folding open when on the road, I did put a lanyard from the top left bolt on the license plate to the rear apron attach bolt. You can see that in the accompanying picture. This allows the plate to partially fold back but not enough to reach "the point of no return". This has worked well and in some 9,000 miles of use I have not found the license plate in the folded position once (It actually cannot completely fold down with the lanyard). For that matter it has never been in a position other than perpendicular!

The resulting assembly relocating the license plate does it's job very well and while there is not much clearance between the plate and the mufflers there is no heat build up.

Monday, November 13, 2006

Let there be lights.

One thing that is a real sore point on the Vstrom is the electirical generating capacity of the bike. It is something like 380 watts of which there is only about 100 watts left in reserve for rider use. That is good enough for running a Gerbing jacket but nothing else - and I usually unplug one of the headlights on my stock 2002 Vstrom if I'm using my Gerbing. Otherwise I use a Widder vest with chaps that is more like 60watts.

That means on those cold nights I had a choice - see the deer and freeze, or don't see as much and be warmer. I had equipped the bike with Phillips HID third generation lights which are absolutely awesome and only draw 70 watts for two. That helped out until I needed some real warmth for me, so the real drawback was the drain from the 55/60 H4's that are standard on the Vstrom and added nothing to my vision once the PHID's were ignited. That had to change...

My solution would be expensive but I felt it would work. The Vstrom has terrific headlight reflectors and H4 bulbs. This is the similar to the FJR and Dale Wilson, aka Warchild over on the FJR and Blackbird communities had pioneered an HID replacement for the OEM bulbs in these bikes. Information for this system and directions for modification can be found here:

http://www.fjrtech.com/getdbitem.cfm?item=49

Of course the PHID's had been absolutely destroyed in the crash so I started with repurchasing that nice little $600 item. Then I got into the self administered group buy from the FJRTech site, for the Low Beam HID replacements for the bikes original reflectors. This was the best $200 I've spent in a long time. I decided that the combination of the PHID's and the low beams would be excellent as opposed to the more comples Hi/Low beam HID bulbs (Rube Golberg comes to mind) option that is available on the FJR site. the FJR tech article above describes in great detail about that installation and the difficulty in wiring.

I had the ballasts for the PHID's in the rear of the motorcycle before, and that was where they were going again. The igniter for the PHID's is attached to the light itself (see the blue box on the back of the light in the close up below) so the ballasts can be placed anywhere on the bike. I had previously extended that harness and used it again to wire the PHID's and place the ballasts in the rear as shown here.

The Headlight HID's presented a totally different problem. The kit from McCulloch included a pre made wiring harness from ballast to igniter to bulb. The distances were very short on the order of 12 to 18 inches which meant I had to locate the ballasts and igniters in the front end of the motorcycle. While the Vstrom is very roomy under the side panesl there is NOTHING to attach too. I decided to make my own bracket that would follow the inside contour of the side panesl and allow structure for me. I made it from 2 inch wide predrilled 1/8 metal strips. I attached the rear of the bracket to the bolts that hold the gas tank forward mounts and used some insulated clamps to attach the front end of the brackets to the cowling frame. This turned out to be a pretty sweet farkle to the bike (one of my best innovations). You can see the two ballasts were attached to the right frame and each igniter was attached at the forward end of the bracket on their respective sides.

As Warchild said in his tech article their is a problem with the wiring of the Low Beam HID's when using the OEM high beam switch to light off the PHID's. That was the configuration I wanted, and to solve the issue (low beam power feeding back to the high beam circuit leaving the PHID's lit at all times) he suggests using a one way Diode in the circuit. My solution, since I had purchased high amp switches, and was going to use them to power the bike lights without a relay, was to use a rectifer instead of a Diode which could handle the higher loads easily. The circuit looks like this:

I used the left light socket and first ran the high beam line through the rectifier and a pigtail back to the relay for the PHID's so that when the high beam was energized it would activate the PHID's. On the exit side of the rectifier I conntected the high and low beam wires together and then ran it to the two separate switches in series so I could control the left and right beams separately. In addition the Vstrom powers up the lights when the key is turned on. Once the starter is deployed all energy is sucked down by the starter and if the HID's are not warmed up enough they will be doused by the starvation of electricity and will not start up without the switches being cycled - a serious problem. The separate switches allow me to turn the lights off when starting the bike and use all energy for the start-up process and after the electrical system has recovered I can energize the lights. It also lets me select both or either of the lights to employ and further save 35 watts from one light being out for use on heated gear. You can see the two switches in the picture above. Even better, they have a red light on each switch so I can tell if they are on or off. Please notice the Datel volt meter forward of the switches. This reads volts (in 10ths) on the system and is run on a direct circuit from the battery.

All the aux lights I have seen on Vstroms are located outside the silhouette of the motorcycle mounted either on a rail sticking out of the front, or are located on crash bars intended to protect the plastic of the bike. That means if the bike is dropped the first thing that will hit is the $600 PHID's! Now, I hate to admit it but I DROP MY MOTORCYCLE ON A REGULAR BASIS. I accept this as fact. Part of rallying and adventure riding is that you will be on uneven soft surfaces in difficult conditions (It is a rallymasters duty to do so). This bike, even lowered is still tall (still, as tall as received from the factory due to the Wilbers Shock and the fork rebuild) and that makes it a handful when rallying. That is a solution just not acceptable. On the prior design I mounted the lights on a special designed bracket that I designed to be held by the windscreen bolt which then layed flush on the front cowling of the bike and was then stuck there with automobile trim tape (Damn Tuff Stuff). Yes my lights were destroyed in the accident but the whole front end of the motorcycle was destroyed as it cartwheeled off the road - no design could have protected those lights in that incident. I will also say that when I found parts of the cowling the bracket I designed had been flattened BUT IT WAS STILL STUCK TO THE COWLING.

That was exactly what I decided to do again and you can see the result in these pictures. The only problem was that the new Windstrom windshiled covered that cowling. I needed to mount the lights (in the same manner) but directly to the Windstrom. To do this I made new brackets and mounted the lights up above the OEM Headlights. This solution keeps the lights inside the silhouette of the motorcycle when it is dropped on either side and better yet provides an awe inspiring amount of light because of the higher mounting. One thing is for sure, these lights cannot be used with oncoming traffic.

I have already had the opportunity to test theis system in about 9,000 miles of riding and rallying and it works like a charm. The Low Beam HIDs are awesome and the PHID's are really only needed as a high beam flash. To do that I usually rin with only the right low beam energized and the PHID's. lit. That way they are warmed up and I can douse them to oncoming traffic or for traffic I'm overtaking and the single Low Beam HID still provides plenty of light. With that configuration I have been able to run a Gerbing Jacket, Gloves (or heated grips) and I am only marginal when running the leg chaps. If I need those (high 20's and low 30's for extended periods) then I can run without the PHID's and use both low beams if I choose. There is a tremendous amount of light with those two low beams but because the PHID's are not warmed up Icannot use them to flash.

The reason for this is because when the PHID's are initially lit they draw a tremendous amount of energy (similar to the starter) for the first 15 to 30 seconds and it may douse the headlights if I am running all the other electrical gear. It is too close to take the chance of dousing my headlights.

This was one of the most sophisticated alterations to the rally bike that I made and is the reason why this post is so long and embellished.

Sunday, November 12, 2006

Auxilliary Fuel, Luggage Rack and Soft Luggage.

One of the issues I had with my old Vstrom was the final weight of bike with gear. The wet weight of the OEM motorcycle is #502. I removed #42 from the bike but added #103 in new additions and changes. Additionally my gear and 5.4 gallons of auxilliary fuel weighed almost #87 bringing the total wet weight up to a whopping #650. To make matters worse the aux fuel hovered above the pillon seat weight so it was being carried very high. This was a design I really wanted to change on the rebuild.

I decided to go with a custom made rack to get the aux fuel down lower. I would use the tank from my CBRXX which holds only about 4 gallons and go with soft luggage to save the weight of the Happy Trails hard bags and very sturdy steel rack. Just to cut to the chase, when I completed the project and cut WAY back on my gear (Hey I no longer had 146 liters of luggage space that would get filled one way or another) the resultant bike had a wet weight of approximately #591 when ready to Rally. That is a savings of almost #60 and very significant in a long multiday activity when you are getting tired.

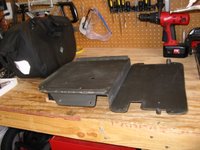
I started by cutting the seat in 1/2 as described before and then I trimmed the rear tail cover to allow for a square platform to be placed in between the riders seat and the tail cone. This still allowed (and left remaining) the tabs to tuck in the rear side panels for assembly to provide a finished look. You saw before How the rear platform was mocked up for fit. Finally I made a mock-up out of 1/4" pressboard and took that to a local fabrication house to have a platform stamped out of 14 ga steel. The resulting Item looked like this:

Next was the luggage rack to hold the soft bags. The bags I chose were available from Aerostitch and have attachments on the backside for hooking them easily to a rail sustem no larger than .75" diameter. Using 5/8" tubing we (Jesse Jiminez, my neighbor who has great mechanical skills, and I who can hold the metal for him while he cuts) bent hoops that would accomodate the luggage and then made structural pieces to cross over the top of the Vstrom rear tail cone (between the cone and the platform) which would be held in place by the bolts that hold the tailcone and the forward attachment points for the standard OEM rack. You can see in these pictures how it all worked: Of course the platform attached to the bike by using the holes in the rear tail cone to bolt through to the subframe (with the luggage crossmember underneath it) and the forward end used the pillon seat attachment with the key release. The resulting Item held the luggage much closer to the bike, was light and while it looks prety wimpy I have dropped the bike (several times) on either side without bending these hoops and once I had to pick up the bike by grabbing the aux fuel tank that is attached to the platform and had no problem there either (I'm simply not easy on my rally equipment).

Saturday, November 11, 2006


Now that the bike was in itty bitty pieces I decided to start small with the rebuild. First the Tourtech GPS holder had been seriously crushed as the bike at sometime landed directly on it. This little bugger had to be completely dismantled and each piece straightened out separately. Hey it was at least one piece I felt I could save and after loosing a set of Staintune pipes and Happy trails bags with racks (for starters) I just wanted a success. I managed to save this item and was very pleased.
By this time I the bike pretty much looked like this:


I went on to planning the rear end of the motorcycle which would receive a significant overhaul. I started by using the spare frame I had obtained and the new rear subframe I had purchased to mock up my ideas. I went through several iterations befor finally settling on a workable Idea and having some metal stamped out: You can see in this picture that I had already chopped the seat in 1/2 and trimmed the rear frame cover to allow for the insertion of the flat platform to which I would attach the auxilliary fuel. This was probably the most difficult part of the rebuild as it required cutting on the parts and metal work which I was not accustomed too. This had to be done precisely since I was going to mount 30 lbs of volatile liquid behind me and did not want it to follow me off the bike in an unscheduled departure. As you can see in the mockup I was also working on the side racks for mounting drybag soft luggage. This of course was part of the objective to keep the motorcycle lighter than before and easier to manage when on day 8 of a long rally (when you are tired and putting a #600 on a centerstand becomes very difficult).

Sunday, October 22, 2006


I brought the hulk home from Washington (Thanks Bill MacAvan for holding it for me and Pete Sutherland for coming to pick it up) and stopped on the way back at a long distance rider meeting in Gerlach Nevada. I put the bike on the trailer and let everyone have a good look at what was left of the bike. I was still not sure what I was going to do with it but after I managed to start the engine, to ensure it was still good, I decided to just start taking it apart and then assess the situation.

As I was taking off parts it was becoming apparent to me that much of the bike was not salvageable. I had verified the engine was good but was still unsure what to do about the frame. See that tab sticking up in the center of the frame? Well, there is supposed to be one on each side of the frame but the left side one was broken clean off in the accident. You can see that clearly in this picture:


I received "divine" guidance one day from ebay when a whole host of parts from another Vstrom appeared at auction. Yes, somebody else had crashed one and was parting it out. Several key items were available and most critically the frame was available so I purchased it along with a swingarm (turned out the seller did not want to buy the special tool to take it apart).

After removing the original frame I found that I could repair it with a good welder and keep the bike "original" as far as titleing goes. The frame I had bought would require me to retitle the bike with a new VIN number and that was going to be a PITA, so up in the attic with that frame.

I still needed a myriad of other items to rebuild this bike so I started collecting parts from Ebay. Along that time I received assistance from Bob Mueller (another Vstrom rider and LD rider who works at Suzuki) who helped me secure some of the more difficult and critical parts I needed to have a chance to finish this project. Between those sources I was able to get new front and rear wheels, new fork tubes, new rear and front subframes, new handlebars and handguards, new brake rotors, new headlights, new front cowl, new rear side cowls, a set of scorpion mufflers and a bunch of smaller parts. I pretty much had to replace most everything with the exception of the frame (which had to be welded) and the engine - which still worked fine.

As I was collecting the parts and ordering new items the picture I wanted for this project was beginning to come into focus. I decided that I would make this into a specifically rally ready motorcycle. It would be lighter weight, have superior lighting, auxilliary fuel built into the bike not slapped on, the suspension would be significantly upgraded and I would make it unique with a red powder coated frame. A plan was established...